


Blurry banding is the ultimate enemy when you’re striving for design perfection. These unwanted marks can ruin the final product and lead to wasted materials and time. Let’s explore the causes behind these bands and how to effectively resolve them.
Understanding DTF Ink Blurry Streaks
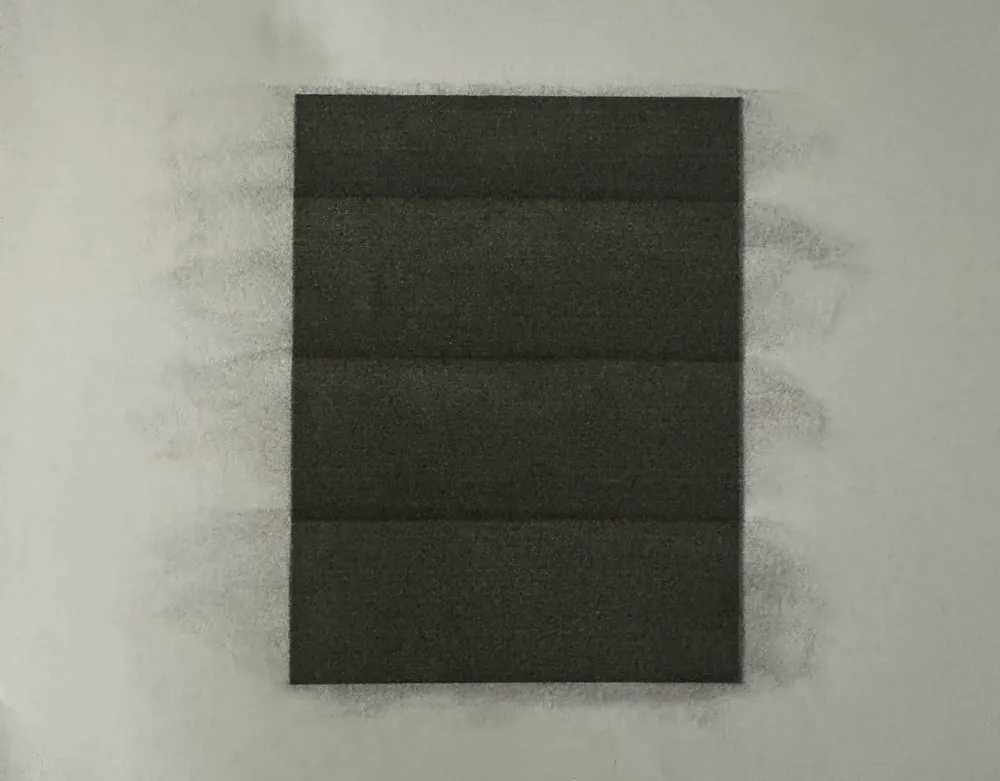
Blurry streaks are faint, typically white lines that appear when ink doesn’t lay down evenly on the film during DTF printing. You’ll most likely notice them when printing solid blocks of color—for example, a large black shape—where you’ll see subtle, blurry streaks disrupting the even fill, like in the image below.
These streaks are typically caused by inconsistent ink flow, clogged nozzles, or incorrect software settings that cause the ink to spread too much before adhering. The factors involved are broad, and the issue could stem from either the printer or the DTF ink.
There are many other problems caused by incorrect settings in the printing software, such as off-color printing, see also: What Causes Color Deviation In DTF Ink Printing
Initial Documentation and Settings for DTF Ink Blurry Streaks
Before making any adjustments, be sure to accurately document the severity of the banding. Clearly photograph and video each print, focusing on the areas where the banding is most noticeable. Also, record your printer software settings: feathering (or “dithering”) values, resolution, print speed, and ink density. With these baseline records, you can compare any improvements or regressions as you adjust settings.
If you are unsure how to make adjustments, keeping these records will also help a printer technician troubleshoot the problem. Providing them with your documentation of the issue and its symptoms will allow them to assist you more quickly. Describing the problem with words alone is often insufficient.
Self-Inspection Methods for DTF Ink Blurry Streaks
When you encounter blurred banding, you can try the following two methods to see if they resolve the issue:
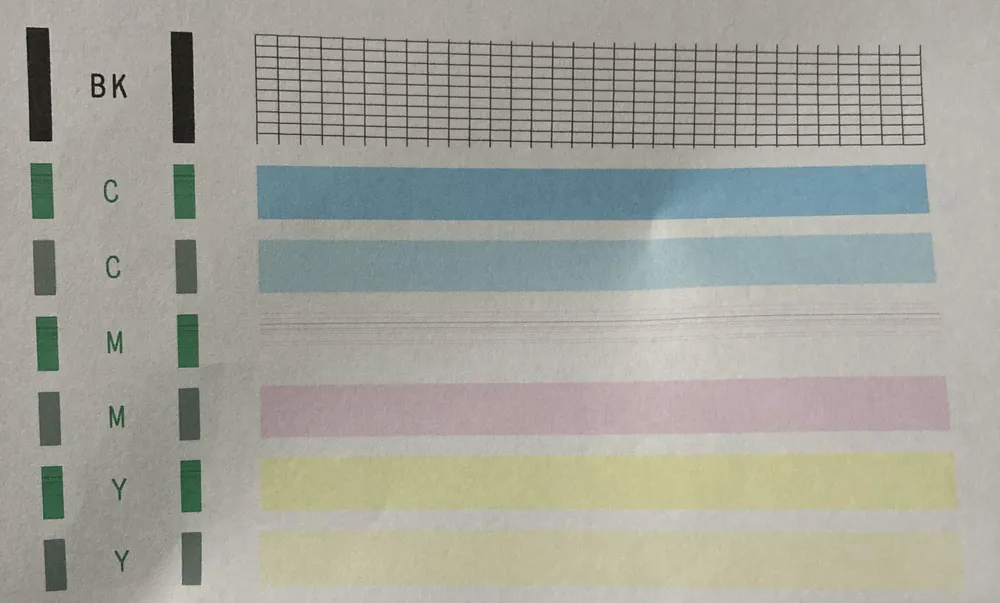
- Print a Nozzle Check Pattern
- Use your printer’s built-in utility to print a nozzle check pattern: a series of colored bars or lines designed to reveal missing or weak nozzles.
- If you see gaps or faded lines in this pattern, it’s a strong indication that some nozzles are clogged or not performing well.
- Adjust Feathering Settings
- In your RIP software or printer driver, locate the feathering parameters (often referred to as “edge smoothing” or “dithering”).
- Increase or decrease the feathering value by small increments, and then reprint a test image.
- Observe whether the banding softens or becomes more pronounced. Sometimes, reducing feathering can prevent excessive ink bleed that creates blurring.
Detailed Solutions for DTF Ink Blurry Streaks
We often receive inquiries from customers about how to resolve issues with blurry streaks in ink. To address this, we have compiled some feasible solutions.
1. Adjust the Feathering Value
First, try adjusting the printer’s feathering settings:
- Lower the Feathering Value: Reducing the extent to which the software pre-softens the edges can typically reduce excess ink.
- Raise the Feathering Value: Increasing edge smoothness helps fill in small nozzle gaps, but may over-blend solid areas.
Test different values in small increments until you find a balance that minimizes streaks without sacrificing clarity.
2. Perform a Complete Printer Calibration
If software adjustments don’t work, reset the printer to its factory calibration:
- Run any built-in alignment and cleaning programs.
- Remove and reinstall the ink cartridges, ensuring they are fully clicked into place.
- Allow the machine to run a thorough cleaning cycle to clear the sub-nozzle lines.
A fresh baseline can often clear hidden clogs and restore even ink delivery.
3. Replace the Printhead or Cable Assembly
If all else fails, a hardware issue may be the cause:
- Replace with a new printhead: Printheads wear out over time, leading to uneven ink droplet ejection.
- Inspect and replace the flat cable: Damaged flat cables can interrupt data flow, causing some nozzles to misfire.
Investing in new components can eliminate stubborn streaks and extend the life of your printer.